Managing Custom Fields/Questions

⌘K
  1. Home
  2. Docs
  3. Managing Custom Fields
  4. Managing Custom Fields/Questions

Managing Custom Fields/Questions

Setting Up Custom Questions

This guide walks you through setting up each question type step by step.

 Field TypeUse it when…
TText FieldYou want attendees to type a free-form answer — short or long.
OptionsYou want attendees to choose from a list of predefined answers (single or multiple choice).
ConfirmationYou need attendees to acknowledge or agree to a statement.
📅Date PickerYou need attendees to select a specific date or date range.

Getting There: Navigating to Custom Questions

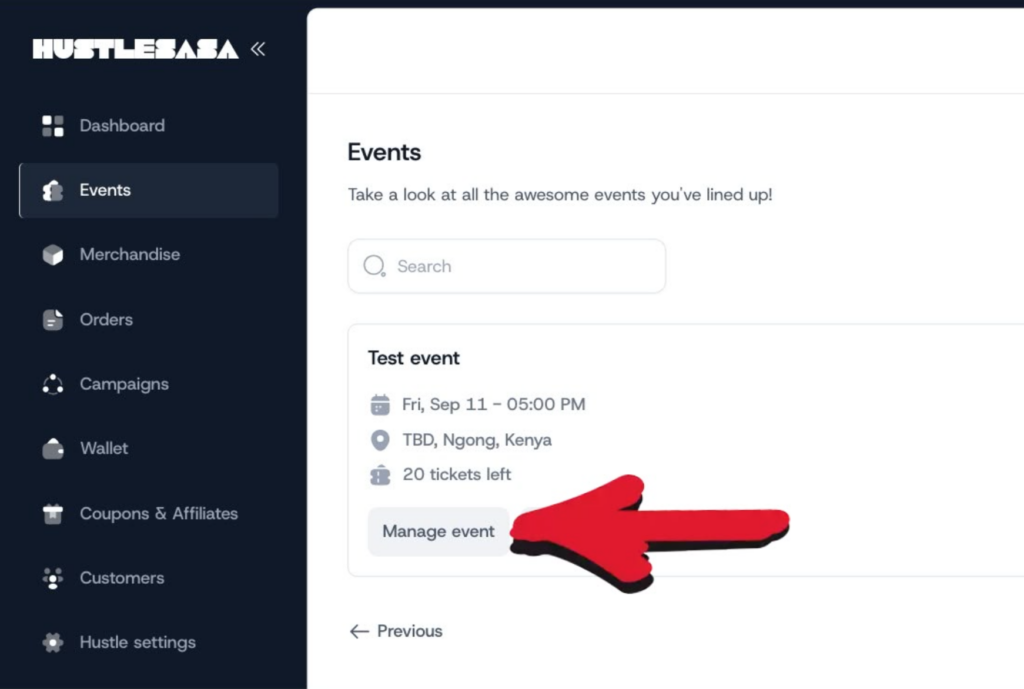
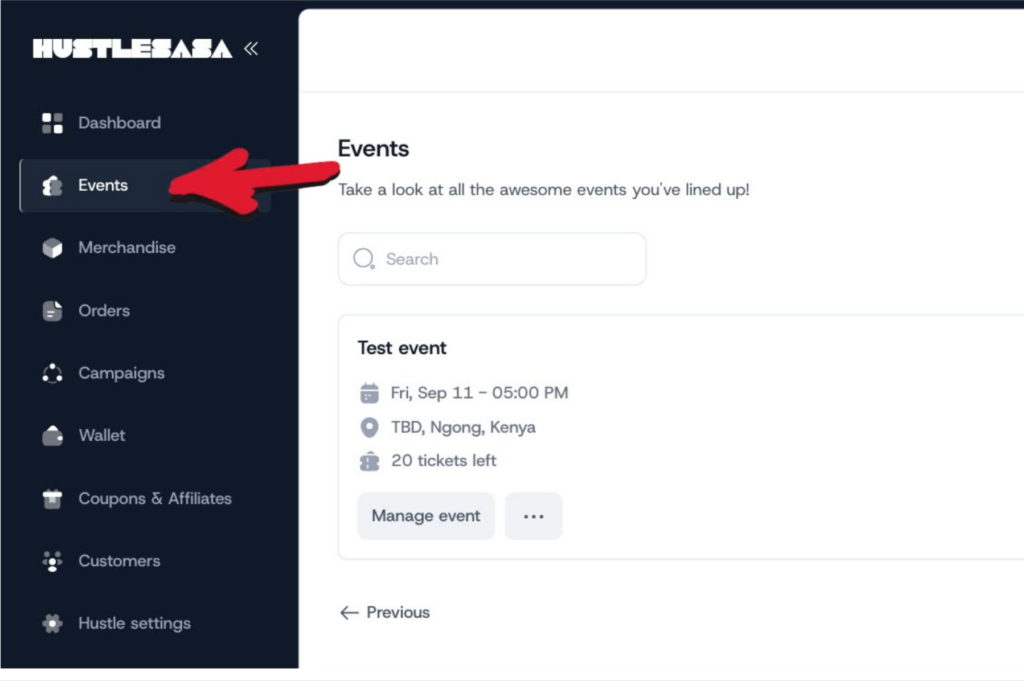
1Go to Events and navigate to the specific event you want to configure.
2Click Manage Event on that event
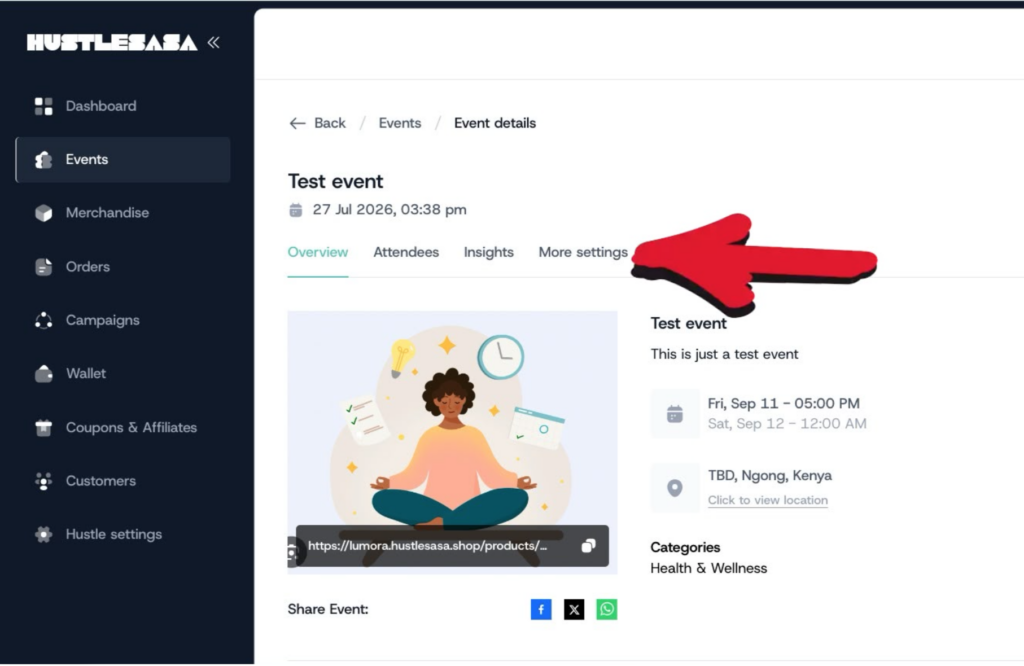
3On the event page, select the More Settings tab.
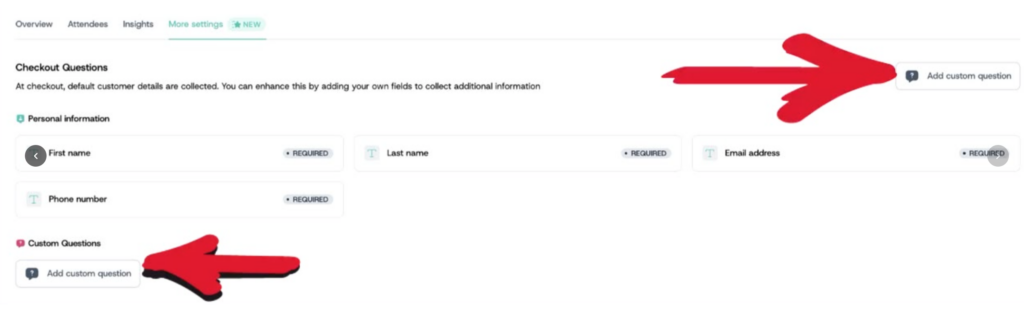
This page shows the mandatory fields attendees are required to fill in at checkout.
4Scroll down to find the Custom Questions section and click Add Custom Question.

A  Text Field

Use a text field when you want attendees to type a written answer.

1Click Text from the field type options on the left.
2Enter your question in the question field
3Choose the answer type: select Short Answer if you expect a brief response (a few words), or Paragraph if you expect a longer written response.
4Toggle the Required button on if attendees must answer this question before completing checkout, or off if it’s optional.
5Click Save Question.

B  Options Field

Use the options field when you want attendees to select from a predefined list of answers

1Click Options from the field type options on the left.
2Enter your question.
3Select the selection type: choose Single if you want attendees to pick only one answer, or Multiple if they can select more than one
4Choose how the options are displayed: List shows all options expanded on screen; Dropdown collapses them into a menu attendees click to open.
5Toggle Required on or off, then click Save Question.

Tip  If you selected Single, you have the option to add follow-up (conditional) questions that only appear when an attendee selects a specific answer. See Section E below.

C  Confirmation Field

Use a confirmation field when you need attendees to acknowledge a statement

1Click Confirmation from the field type options on the left.
2Enter the statement or text you want attendees to confirm
3Toggle Required on or off, then click Save Question.

D  Date Picker Field

Use a date picker when you need attendees to select a specific date or range of dates

1Click Date Picker from the field type options on the left
2Enter your question
3Select the response type: choose Single Date if you want the attendee to pick one specific date, or Date Range if you want them to select a start and end date.
4Toggle Required on or off, then click Save Question.

E  Conditional Follow-Up Questions

Follow-up questions are only available on Options fields set to Single type. They allow you to show an additional question only when an attendee selects a specific answer — keeping the form clean and relevant for each attendee.

1After saving an Options field (Single type), return to the question and click Add Follow-Up on the specific answer you want to attach a follow-up question to
2Select the follow-up field type: Text for a written response, Confirmation for an acknowledgement, or Date Picker for a date selection.
3Enter the follow-up question or statement depending on the type chosen
4For Date Picker follow-ups, also select Single Date or Date Range as the response type.
5Toggle Required on or off, then click Save Question.

F  Managing Your Questions

After saving a question, you are taken back to the More Settings page where you can manage all the custom questions you have set up for that event.

1To delete a question, click the delete icon next to the question you want to remove.
2To rearrange the order questions appear at checkout, drag and drop them into your preferred order.
3To edit a question, click Edit Question. This takes you back to the setup page where you can make any changes and save.
4Once you’re happy with your questions, click the Preview button to see exactly how the checkout will appear to attendees before the event goes live.

Accessing Attendee & Order Data

Part 1: Viewing Attendee Information

Step 1: Navigate to the Attendees Tab

  • Open event feature on the web
  • Locate and click the Attendees tab under event tab under “manage event”

Step 2: Review the Attendees List

  • You’ll see a table/list of all attendees for the event, showing key info per line — typically name, ticket type, purchase date, email etc
  • Each row represents one buyer/attendee

Step 3: View Full Details for an Attendee

  • On the row of the attendee you want to inspect, click See More Info
  • This opens the attendee’s full profile, including:
    • Personal information (name, email etc)
    • Custom question responses — any additional info collected via custom fields/questions set up for the event

Step 4: Export the Attendee List

  • On the main Attendees tab view
  • Click the Export Attendees button
  • This generates a downloadable file ( CSV ) containing the attendees data

Part 2: Viewing Order Details

Step 1: Go to the Orders Section

  • Navigate to the Orders tab/feature from the web app

Step 2: Select an Order

  • Click on any individual order from the list to open its details

Step 3: Review Order Details

  • The order detail view will show:
    • Buyer information
    • All products/tickets included in that order
    • Pricing and payment details
    • Custom fields filled per product — any custom question responses tied specifically to each product/ticket type within that order

How can we help?